DIY: Oil Change
 03-03-2008, 05:46 PM
#81
Suzuka Master

Originally Posted by Honda2.4
http://www.mobiloil.com/USA-English/...1_Brochure.pdf
I don't agree. Honda tested all the retail PCMO's on the shelf. According to Honda R&D, not Mobil, the others failed miserably. One passed, barely, but not enough for me to use it.
I don't agree. Honda tested all the retail PCMO's on the shelf. According to Honda R&D, not Mobil, the others failed miserably. One passed, barely, but not enough for me to use it.

(sorry I never liked quaker state...)
And if you notice on a graph oil "A" meets minimally acceptable, and given marketing gimmicks, the graph shown might not go in equal units, so the gap looks very big because it was magnified like crazy
 03-14-2008, 10:59 AM
#83
RiDiX w/ Tech

Join Date: Jan 2007
Location: NJ
Age: 45
Posts: 25
Likes: 0
Received 0 Likes
on
0 Posts
Nice write up. I think I�ll do my own oil change next time.
I have a question about the amount of oil to put in. I think in the manual it states 4.9Qt, so roughly about 5 Qt. Should more oil be added until the oil level reads full on the dip stick?
I got an oil change at R & S yesterday, and had them use the M1 5Qt jug and a M1 oil filter I brought from WalMart. After dumping the whole 5Qt in, the mechanic checked the dip stick and said it was a little short. They wanted to put a little more in to top it off to full. I told him the manual only recommends 5 Qts. I asked them not to add any more, and that I will check again when I get home to add more if necessary.
Do I need to top it?
03-14-2008, 11:50 AM
#84
Senior Moderator
Originally Posted by m28matrix
Nice write up. I think I�ll do my own oil change next time.
I have a question about the amount of oil to put in. I think in the manual it states 4.9Qt, so roughly about 5 Qt. Should more oil be added until the oil level reads full on the dip stick?
I got an oil change at R & S yesterday, and had them use the M1 5Qt jug and a M1 oil filter I brought from WalMart. After dumping the whole 5Qt in, the mechanic checked the dip stick and said it was a little short. They wanted to put a little more in to top it off to full. I told him the manual only recommends 5 Qts. I asked them not to add any more, and that I will check again when I get home to add more if necessary.
Do I need to top it?
I have a question about the amount of oil to put in. I think in the manual it states 4.9Qt, so roughly about 5 Qt. Should more oil be added until the oil level reads full on the dip stick?
I got an oil change at R & S yesterday, and had them use the M1 5Qt jug and a M1 oil filter I brought from WalMart. After dumping the whole 5Qt in, the mechanic checked the dip stick and said it was a little short. They wanted to put a little more in to top it off to full. I told him the manual only recommends 5 Qts. I asked them not to add any more, and that I will check again when I get home to add more if necessary.
Do I need to top it?
I would. It doesn't hurt to overfill a bit but it will kill if the motor is starved of oil (that doesn't mean go and put in a whole litre, I'd aim at the 2nd dot on the dot
 )
03-14-2008, 01:02 PM
)
03-14-2008, 01:02 PM
#85
2021 RDX A SPEC
How-To Steps (this helped me do my DIY on the TSX)
Getting Ready
Step 1:
Gather necessary tools and materials (refer to Necessary Items list). If you plan to change your oil regularly, consider investing in jack stands, a socket set and an oil drain pan.
Step 2:
Run the car's engine for 10 minutes before you drain the oil. Warm oil drains faster than cold oil.
Step 3:
Park the car on a level surface, engage the parking brake and turn off the engine. If your car has a low clearance, raise it by driving it onto a ramp or by jacking it up and supporting it securely.
Step 4:
Open the hood and place the new oil and funnel on top of the engine to ensure that you won't forget to add oil afterwards (an expensive mistake that many do-it-yourselfers make!).
Draining the Oil and Changing the Oil Filter
Step 1:
Crawl under the car once it is securely supported.
Step 2:
Locate the oil drain plug on the underside of the engine, usually near the front center of the car. Consult your owner's manual for the exact location.
Step 3:
Place the oil drain pan under the plug and loosen the plug with a socket wrench. Remember: turn counterclockwise to remove bolts.
Step 4:
Remove the plug by hand. Be prepared for the rush of hot oil!
Step 5:
Let the oil drain into the pan. Hold onto the plug.
Step 6:
Reposition the pan, if necessary, to catch all the dripping oil.
Step 7:
Wipe off the drain plug and the plug opening when the oil finishes draining.
Step 8:
Replace the drain plug gasket.
Step 9:
Reinstall the plug. Always start threading any bolts or screws by hand to prevent cross threading.
Step 10:
Tighten with a wrench or socket. Be careful not to overtighten the plug.
Step 11:
Locate the existing oil filter. Oil filters are usually on the side of the engine.
Step 12:
Position the oil pan underneath the filter to catch any remaining oil.
Step 13:
Use an adjustable oil filter wrench to unscrew the old oil filter.
Step 14:
Use a rag to wipe the area where the filter mounts to the engine. Make sure the rubber seal of the old filter is not stuck to the engine.
Step 15:
Use some new oil to lightly coat the rubber seal of the new filter.
Step 16:
Screw the new filter into place by hand. It's usually not necessary to tighten the oil filter with the oil filter wrench, but have it at the ready if you're grip's not strong (or large) enough.
Installing New Oil and Cleaning Up
Step 1:
Locate the oil filler cap on top of the engine. Remove it.
Step 2:
Place the funnel in the opening and pour in the new oil. Typically, you will use 4 to 5 quarts of oil. Check your manual for the correct oil capacity.
Step 3:
Replace the cap when you're finished.
Step 4:
Run the engine for a minute, then check the dipstick. Add more oil if necessary.
Step 5:
Check the area around the oil drain plug and the filter for oil leaks. Tighten the plug or oil filter if you find leakage.
Step 6:
Use rags and newspapers to wipe away excess oil.
Step 7:
Pour the used oil into a plastic container after the used oil cools.
Step 8:
Dispose the used oil properly: either bring it to a recycling center or an auto repair shop that can recycle it for you. Don't pour it down the sewer!
The following users liked this post:
Last Acura (09-05-2012)
03-14-2008, 09:23 PM
#86
Sporty X type
Thread Starter
Originally Posted by Acura604
How-To Steps (this helped me do my DIY on the TSX)
Getting Ready
Step 1:
Gather necessary tools and materials (refer to Necessary Items list). If you plan to change your oil regularly, consider investing in jack stands, a socket set and an oil drain pan.
Step 2:
Run the car's engine for 10 minutes before you drain the oil. Warm oil drains faster than cold oil.
Step 3:
Park the car on a level surface, engage the parking brake and turn off the engine. If your car has a low clearance, raise it by driving it onto a ramp or by jacking it up and supporting it securely.
Step 4:
Open the hood and place the new oil and funnel on top of the engine to ensure that you won't forget to add oil afterwards (an expensive mistake that many do-it-yourselfers make!).
Draining the Oil and Changing the Oil Filter
Step 1:
Crawl under the car once it is securely supported.
Step 2:
Locate the oil drain plug on the underside of the engine, usually near the front center of the car. Consult your owner's manual for the exact location.
Step 3:
Place the oil drain pan under the plug and loosen the plug with a socket wrench. Remember: turn counterclockwise to remove bolts.
Step 4:
Remove the plug by hand. Be prepared for the rush of hot oil!
Step 5:
Let the oil drain into the pan. Hold onto the plug.
Step 6:
Reposition the pan, if necessary, to catch all the dripping oil.
Step 7:
Wipe off the drain plug and the plug opening when the oil finishes draining.
Step 8:
Replace the drain plug gasket.
Step 9:
Reinstall the plug. Always start threading any bolts or screws by hand to prevent cross threading.
Step 10:
Tighten with a wrench or socket. Be careful not to overtighten the plug.
Step 11:
Locate the existing oil filter. Oil filters are usually on the side of the engine.
Step 12:
Position the oil pan underneath the filter to catch any remaining oil.
Step 13:
Use an adjustable oil filter wrench to unscrew the old oil filter.
Step 14:
Use a rag to wipe the area where the filter mounts to the engine. Make sure the rubber seal of the old filter is not stuck to the engine.
Step 15:
Use some new oil to lightly coat the rubber seal of the new filter.
Step 16:
Screw the new filter into place by hand. It's usually not necessary to tighten the oil filter with the oil filter wrench, but have it at the ready if you're grip's not strong (or large) enough.
Installing New Oil and Cleaning Up
Step 1:
Locate the oil filler cap on top of the engine. Remove it.
Step 2:
Place the funnel in the opening and pour in the new oil. Typically, you will use 4 to 5 quarts of oil. Check your manual for the correct oil capacity.
Step 3:
Replace the cap when you're finished.
Step 4:
Run the engine for a minute, then check the dipstick. Add more oil if necessary.
Step 5:
Check the area around the oil drain plug and the filter for oil leaks. Tighten the plug or oil filter if you find leakage.
Step 6:
Use rags and newspapers to wipe away excess oil.
Step 7:
Pour the used oil into a plastic container after the used oil cools.
Step 8:
Dispose the used oil properly: either bring it to a recycling center or an auto repair shop that can recycle it for you. Don't pour it down the sewer!
Getting Ready
Step 1:
Gather necessary tools and materials (refer to Necessary Items list). If you plan to change your oil regularly, consider investing in jack stands, a socket set and an oil drain pan.
Step 2:
Run the car's engine for 10 minutes before you drain the oil. Warm oil drains faster than cold oil.
Step 3:
Park the car on a level surface, engage the parking brake and turn off the engine. If your car has a low clearance, raise it by driving it onto a ramp or by jacking it up and supporting it securely.
Step 4:
Open the hood and place the new oil and funnel on top of the engine to ensure that you won't forget to add oil afterwards (an expensive mistake that many do-it-yourselfers make!).
Draining the Oil and Changing the Oil Filter
Step 1:
Crawl under the car once it is securely supported.
Step 2:
Locate the oil drain plug on the underside of the engine, usually near the front center of the car. Consult your owner's manual for the exact location.
Step 3:
Place the oil drain pan under the plug and loosen the plug with a socket wrench. Remember: turn counterclockwise to remove bolts.
Step 4:
Remove the plug by hand. Be prepared for the rush of hot oil!
Step 5:
Let the oil drain into the pan. Hold onto the plug.
Step 6:
Reposition the pan, if necessary, to catch all the dripping oil.
Step 7:
Wipe off the drain plug and the plug opening when the oil finishes draining.
Step 8:
Replace the drain plug gasket.
Step 9:
Reinstall the plug. Always start threading any bolts or screws by hand to prevent cross threading.
Step 10:
Tighten with a wrench or socket. Be careful not to overtighten the plug.
Step 11:
Locate the existing oil filter. Oil filters are usually on the side of the engine.
Step 12:
Position the oil pan underneath the filter to catch any remaining oil.
Step 13:
Use an adjustable oil filter wrench to unscrew the old oil filter.
Step 14:
Use a rag to wipe the area where the filter mounts to the engine. Make sure the rubber seal of the old filter is not stuck to the engine.
Step 15:
Use some new oil to lightly coat the rubber seal of the new filter.
Step 16:
Screw the new filter into place by hand. It's usually not necessary to tighten the oil filter with the oil filter wrench, but have it at the ready if you're grip's not strong (or large) enough.
Installing New Oil and Cleaning Up
Step 1:
Locate the oil filler cap on top of the engine. Remove it.
Step 2:
Place the funnel in the opening and pour in the new oil. Typically, you will use 4 to 5 quarts of oil. Check your manual for the correct oil capacity.
Step 3:
Replace the cap when you're finished.
Step 4:
Run the engine for a minute, then check the dipstick. Add more oil if necessary.
Step 5:
Check the area around the oil drain plug and the filter for oil leaks. Tighten the plug or oil filter if you find leakage.
Step 6:
Use rags and newspapers to wipe away excess oil.
Step 7:
Pour the used oil into a plastic container after the used oil cools.
Step 8:
Dispose the used oil properly: either bring it to a recycling center or an auto repair shop that can recycle it for you. Don't pour it down the sewer!
03-15-2008, 04:09 PM
#87

Well, I'm a new RDX owner and am looking at doing my own oil changes down the road. Here is one little part that I found to be a great help when doing oil changes on my WRX:
Fumoto Valve - http://www.fumotousa.com/
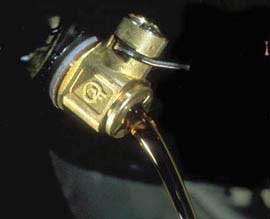
It's a valve that lets you adjust the flow out of the drain pan... no more mess's! Also, not to worry - It's well designed in a way that a rock or debris cannot open the valve up while driving.
Has anybody done this to their RDX yet? I haven't been under the vehicle yet, but the site lists only two different Acura applications: 4 cyl and 6 cyl. Now, I know next to nothing about Honda engines, so would our turbo 4 cyl engine fit into the "normal" 4 cyl category? Also for those that have done the oil changes, will it need the adapter for recessed drain plug configurations?
Fumoto Valve - http://www.fumotousa.com/
It's a valve that lets you adjust the flow out of the drain pan... no more mess's! Also, not to worry - It's well designed in a way that a rock or debris cannot open the valve up while driving.
Has anybody done this to their RDX yet? I haven't been under the vehicle yet, but the site lists only two different Acura applications: 4 cyl and 6 cyl. Now, I know next to nothing about Honda engines, so would our turbo 4 cyl engine fit into the "normal" 4 cyl category? Also for those that have done the oil changes, will it need the adapter for recessed drain plug configurations?
03-16-2008, 04:01 PM
#88
Grand Pubah

Join Date: Apr 2007
Location: Jacksonville, Fl
Age: 52
Posts: 13
Likes: 0
Received 0 Likes
on
0 Posts
Hey... Lrpba... 2nd change and still referred to this post... thanks again...... oh also... had the a16 service come up... bought the last oil from auto store but found the 5w30 at Wally Word @ 22.80 for 5qts...saved a few $$$ suggest all try Wally 1st... though my Wally didnt carry any M1 filters and the FRAM autoputer didnt reference any filters for '07 RDX.
03-17-2008, 05:23 AM
#90
Grand Pubah
Join Date: Apr 2007
Location: Jacksonville, Fl
Age: 52
Posts: 13
Likes: 0
Received 0 Likes
on
0 Posts
Originally Posted by Lrpba300
again, your welcome. Ain't it easy to do?? I usually get my M1 filter from Advanced Auto, but I'm sure there are others. Enjoy!
03-17-2008, 01:43 PM
#91
Sporty X type
Thread Starter
Originally Posted by one4gatr
Yeah very easy... so much more than my MDX. I ended up getting the M1 filter at AutoZone... I was just trying to avoid taking a 2nd trip. In then end it was worth going to Wally World for the oil but had the one extra stop for filters... $9.99 a pop... ouch...
04-02-2008, 01:24 PM
#92
2nd Gear

Join Date: Apr 2008
Age: 35
Posts: 2
Likes: 0
Received 0 Likes
on
0 Posts
first timer...
oil changes at the dealership are $$$ so im trying to save myself some money
what tool do u use to get those numbers to plug the engine oil?
and
does anyone know the measurements for the washers?
oil changes at the dealership are $$$ so im trying to save myself some money
Originally Posted by sasair
29 lbf�ft (39 N�m , 4.0 kgf�m)
and
does anyone know the measurements for the washers?
04-02-2008, 07:30 PM
#93
Burning Brakes
Originally Posted by tacca_chantieri
first timer...
oil changes at the dealership are $$$ so im trying to save myself some money
what tool do u use to get those numbers to plug the engine oil?
and
does anyone know the measurements for the washers?
oil changes at the dealership are $$$ so im trying to save myself some money
what tool do u use to get those numbers to plug the engine oil?
and
does anyone know the measurements for the washers?
04-02-2008, 07:32 PM
#94
Moderator
Originally Posted by mav238
Just tighten it with the finger, and then follow through with a quarter turn with the wrench.
 04-02-2008, 08:42 PM
#95
'06 RL Tech
Originally Posted by G&V
Well, I'm a new RDX owner and am looking at doing my own oil changes down the road. Here is one little part that I found to be a great help when doing oil changes on my WRX:
Fumoto Valve - http://www.fumotousa.com/
It's a valve that lets you adjust the flow out of the drain pan... no more mess's! Also, not to worry - It's well designed in a way that a rock or debris cannot open the valve up while driving.
Has anybody done this to their RDX yet? I haven't been under the vehicle yet, but the site lists only two different Acura applications: 4 cyl and 6 cyl. Now, I know next to nothing about Honda engines, so would our turbo 4 cyl engine fit into the "normal" 4 cyl category? Also for those that have done the oil changes, will it need the adapter for recessed drain plug configurations?
04-02-2008, 10:20 PM
#96
Three Wheelin'
Originally Posted by tacca_chantieri
what tool do u use to get those numbers to plug the engine oil?
Originally Posted by tacca_chantieri
does anyone know the measurements for the washers?
04-02-2008, 10:23 PM
#97
Moderator
Originally Posted by sasair
Torque wrench.
04-02-2008, 10:28 PM
#98
Three Wheelin'
Originally Posted by SodaLuvr
If you need a torque wrench to prevent you from under/over tightening the drain plug during an engine oil change, you probably shouldn't be touching it.
04-07-2008, 09:04 AM
#100
10th Gear

Join Date: Dec 2007
Age: 44
Posts: 11
Likes: 0
Received 0 Likes
on
0 Posts
i was looking into doing my own oil change and went to walmart to buy the filter but they ran out was wondering if anyone knows if you can use another filter...was thinking of using the KNN filter. I hear they are pretty good
http://www.autopartswarehouse.com/se...X&N=0&uts=true
dont know if this was allowed instead of the mobil 1 air filter? i was also going to install the
http://www.knfilters.com/search/prod...x?Prod=33-2382
this seemed like a good buy as well for the filter replacement.
Or
should i just try and stick with the mobil 1 filter? i did get the mobil 1 oil? Thanks for the input.
04-17-2008, 02:14 PM
#102
10th Gear

Join Date: Apr 2008
Age: 44
Posts: 13
Likes: 0
Received 0 Likes
on
0 Posts
Originally Posted by Acura604
How-To Steps (this helped me do my DIY on the TSX)
Step 1:
Locate the oil filler cap on top of the engine. Remove it.
Step 1:
Locate the oil filler cap on top of the engine. Remove it.
As a matter of fact, raise the dipstick and open the oil filler car before draining. This helps the car drain better and more completely...since there is an opening on both ends.
 05-25-2008, 08:38 AM
#104
Suzuka Master
Just got 5qt Mobil 1 from walmart. I noticed that the receipt does not say its Mobil 1, it just says something like "MOTOR OIL 2804903924" and price of $22+tax. It this a sufficient receipt for warranty issues (if they arise)?
05-25-2008, 10:40 AM
#105
Senior Moderator
I guess you can cut the back label off and keep it.
Dude next time try pennzoil platinum (a. it actually states hto-06 certification on the bottle and b. motor sounds a lot better and feels smoother on my butt dyno)
Dude next time try pennzoil platinum (a. it actually states hto-06 certification on the bottle and b. motor sounds a lot better and feels smoother on my butt dyno)
05-26-2008, 08:22 AM
#106
Suzuka Master
Originally Posted by mau108
I guess you can cut the back label off and keep it.
Dude next time try pennzoil platinum (a. it actually states hto-06 certification on the bottle and b. motor sounds a lot better and feels smoother on my butt dyno)
Dude next time try pennzoil platinum (a. it actually states hto-06 certification on the bottle and b. motor sounds a lot better and feels smoother on my butt dyno)
Yeah, just to be safe I will save the label. But I have a feeling that dealer will not give you hard time about warranty, unless of course they open up the engine and see some serious abuse of not changing oil. But better keep all paper work, you never know....
05-26-2008, 09:26 AM
#107

Originally Posted by Acura604
How-To Steps (this helped me do my DIY on the TSX)
Getting Ready
Step 1:
Gather necessary tools and materials (refer to Necessary Items list). If you plan to change your oil regularly, consider investing in jack stands, a socket set and an oil drain pan.
Step 2:
Run the car's engine for 10 minutes before you drain the oil. Warm oil drains faster than cold oil.
Step 3:
Park the car on a level surface, engage the parking brake and turn off the engine. If your car has a low clearance, raise it by driving it onto a ramp or by jacking it up and supporting it securely.
Step 4:
Open the hood and place the new oil and funnel on top of the engine to ensure that you won't forget to add oil afterwards (an expensive mistake that many do-it-yourselfers make!).
Draining the Oil and Changing the Oil Filter
Step 1:
Crawl under the car once it is securely supported.
Step 2:
Locate the oil drain plug on the underside of the engine, usually near the front center of the car. Consult your owner's manual for the exact location.
Step 3:
Place the oil drain pan under the plug and loosen the plug with a socket wrench. Remember: turn counterclockwise to remove bolts.
Step 4:
Remove the plug by hand. Be prepared for the rush of hot oil!
Step 5:
Let the oil drain into the pan. Hold onto the plug.
Step 6:
Reposition the pan, if necessary, to catch all the dripping oil.
Step 7:
Wipe off the drain plug and the plug opening when the oil finishes draining.
Step 8:
Replace the drain plug gasket.
Step 9:
Reinstall the plug. Always start threading any bolts or screws by hand to prevent cross threading.
Step 10:
Tighten with a wrench or socket. Be careful not to overtighten the plug.
Step 11:
Locate the existing oil filter. Oil filters are usually on the side of the engine.
Step 12:
Position the oil pan underneath the filter to catch any remaining oil.
Step 13:
Use an adjustable oil filter wrench to unscrew the old oil filter.
Step 14:
Use a rag to wipe the area where the filter mounts to the engine. Make sure the rubber seal of the old filter is not stuck to the engine.
Step 15:
Use some new oil to lightly coat the rubber seal of the new filter.
Step 16:
Screw the new filter into place by hand. It's usually not necessary to tighten the oil filter with the oil filter wrench, but have it at the ready if you're grip's not strong (or large) enough.
Installing New Oil and Cleaning Up
Step 1:
Locate the oil filler cap on top of the engine. Remove it.
Step 2:
Place the funnel in the opening and pour in the new oil. Typically, you will use 4 to 5 quarts of oil. Check your manual for the correct oil capacity.
Step 3:
Replace the cap when you're finished.
Step 4:
Run the engine for a minute, then check the dipstick. Add more oil if necessary.
Step 5:
Check the area around the oil drain plug and the filter for oil leaks. Tighten the plug or oil filter if you find leakage.
Step 6:
Use rags and newspapers to wipe away excess oil.
Step 7:
Pour the used oil into a plastic container after the used oil cools.
Step 8:
Dispose the used oil properly: either bring it to a recycling center or an auto repair shop that can recycle it for you. Don't pour it down the sewer!
06-09-2008, 09:35 AM
#108

Originally Posted by pmaggan
My last three cars were BMWs and I really do miss the BMW oil filter location. BMWs have a little canister located in the engine bay which houses the oil filter. All you have to do is remove the canister top, yank out the old filter, drop in a new one, and screw on the canister top. No mess whatsoever. Draining the oil is the same as the RDX, of course.
06-25-2008, 07:35 PM
#109
Suzuka Master
for those of you who prefer to use Honda oil filter, - don't buy OEM wrench, its too expensive ($25), I just bought one that has exact fit at PepBoys for $4, it works great
07-27-2008, 09:27 PM
#110
Senior Moderator
just as an update/follow up
so I have had Pennzoil Platinum in the car and the OLM is down to 10% and I gotta say this oil is 100 times better then M1 based on engine noise level. Engine is purring like the day I poured PP in so the oil I'm guessing has not sheared down compared to the m1 i had in there before which probably did (noticed a drastic change in engine acoustics..I have an ear for motor noises lol, today I was sitting on my pourch listening to car motors as they drove by, note the new crv's motor is quite loud eh! do they still use the same k24?).
PP is the way to go, I suggest others that can get their hands on Pennzoil Platinum 5w30 oil to give it a try. Going to dump the oil this week sometime BTW the oil has about 6000KM on it, not the best on synthetic but not bad for turbo solution, I'm sure the oil can last at least another 2000km but I'm going by car's olm.
so I have had Pennzoil Platinum in the car and the OLM is down to 10% and I gotta say this oil is 100 times better then M1 based on engine noise level. Engine is purring like the day I poured PP in so the oil I'm guessing has not sheared down compared to the m1 i had in there before which probably did (noticed a drastic change in engine acoustics..I have an ear for motor noises lol, today I was sitting on my pourch listening to car motors as they drove by, note the new crv's motor is quite loud eh! do they still use the same k24?).
PP is the way to go, I suggest others that can get their hands on Pennzoil Platinum 5w30 oil to give it a try. Going to dump the oil this week sometime
BTW the oil has about 6000KM on it, not the best on synthetic but not bad for turbo solution, I'm sure the oil can last at least another 2000km but I'm going by car's olm.
07-27-2008, 09:42 PM
#111
Suzuka Master
you can't hear differences between oils, its all in your head
someone should do oil analysis and see if Honda is asking for too frequent oil changes... mine comes up every 3700 miles, and driving is very normal....
someone should do oil analysis and see if Honda is asking for too frequent oil changes... mine comes up every 3700 miles, and driving is very normal....
07-28-2008, 05:57 PM
#113
Suzuka Master
Originally Posted by SinCity
Russian: You must drive hard for it to come up every 3700? That seems a bit too frequent.
07-28-2008, 06:45 PM
#114
Senior Moderator
Originally Posted by russianDude
you can't hear differences between oils, its all in your head
someone should do oil analysis and see if Honda is asking for too frequent oil changes... mine comes up every 3700 miles, and driving is very normal....
someone should do oil analysis and see if Honda is asking for too frequent oil changes... mine comes up every 3700 miles, and driving is very normal....
dude if your running m1 in your car now, try pp on your next change and then let me know.
Pay attention to your motor's sound now and then when you put in the pp.
I'm not gaining anything by promoting PP, its not only me but many others on BITOG (an oil forum) that feel the same and some of those guys are oil fanatics.
07-28-2008, 07:05 PM
#115
Suzuka Master
Originally Posted by mau108
dude if your running m1 in your car now, try pp on your next change and then let me know.
Pay attention to your motor's sound now and then when you put in the pp.
I'm not gaining anything by promoting PP, its not only me but many others on BITOG (an oil forum) that feel the same and some of those guys are oil fanatics.
Pay attention to your motor's sound now and then when you put in the pp.
I'm not gaining anything by promoting PP, its not only me but many others on BITOG (an oil forum) that feel the same and some of those guys are oil fanatics.
if penzoil is cheaper, i'll get it next time. I guess mobil 1 makes you feel special because its also factory fill..
07-28-2008, 08:21 PM
#116
Senior Moderator
Originally Posted by russianDude
if penzoil is cheaper, i'll get it next time. I guess mobil 1 makes you feel special because its also factory fill..
cuz exxonmobil has the $$$ to pay honda for that where as pp is putting their money towards better things :P (wild guess)
down south you guys should be getting PP for dirt cheap, as cheap as regular dino oil up here in Canada.
07-29-2008, 11:25 AM
#117
Advanced

Join Date: Apr 2005
Age: 47
Posts: 67
Likes: 0
Received 0 Likes
on
0 Posts
XOM does not pay OEM's to use their oil.
http://www.mobiloil.com/USA-English/...1_Brochure.pdf
PP is a very good oil, one of the only oils on the market to meet the HTO-06 spec. Amsoil only recommends their SSO for this vehicle and Valvoline won't have an oil that meets this spec until 2009. What does that tell you?
It's a common misconception that Mobil pays automakers to use their oil. XOM's flagship product is their synthetic lubricants, which range from Jet Engine oils to regular passenger car motor oils. They are not always the best, but due to the size of XOM, they can deliver very high quality lubricants on a global scale at competitive prices. Remember, XOM produces and makes many of the base oils and additives the other brands buy from XOM.
07-29-2008, 11:48 PM
#118
Cruisin'

Join Date: Jul 2008
Age: 63
Posts: 20
Likes: 0
Received 0 Likes
on
0 Posts
On a 3 year lease I cannot justify buying a $250+ torque wrench just to change the oil. You guys must have another reason for these tools or you are planning on using them on other vehicles.
Stinks too, becuase I would enjoy changing my own oil. I used to do it on my American V-8s and know the satisfaction obtained from knowing the work was done right.
Stinks too, becuase I would enjoy changing my own oil. I used to do it on my American V-8s and know the satisfaction obtained from knowing the work was done right.
07-30-2008, 08:42 PM
#119
Senior Moderator
Originally Posted by STLBill
On a 3 year lease I cannot justify buying a $250+ torque wrench just to change the oil. You guys must have another reason for these tools or you are planning on using them on other vehicles.
Stinks too, becuase I would enjoy changing my own oil. I used to do it on my American V-8s and know the satisfaction obtained from knowing the work was done right.
Stinks too, becuase I would enjoy changing my own oil. I used to do it on my American V-8s and know the satisfaction obtained from knowing the work was done right.
you don't need a torque wrench and even if you did its only 40-50 bucks here in Canada, im sure down in the US you can grab it for dirt cheap.
How did you change your oil on your american v8? same concept for the rdx.
07-30-2008, 08:59 PM
#120
Suzuka Master
Originally Posted by STLBill
On a 3 year lease I cannot justify buying a $250+ torque wrench just to change the oil. You guys must have another reason for these tools or you are planning on using them on other vehicles.
Stinks too, becuase I would enjoy changing my own oil. I used to do it on my American V-8s and know the satisfaction obtained from knowing the work was done right.
Stinks too, becuase I would enjoy changing my own oil. I used to do it on my American V-8s and know the satisfaction obtained from knowing the work was done right.